Thursday, September 22, 2016

Lesson 12: Tech Class - Sound

Audio is more important than visual. Improving the audio can raise the overall quality of the film.
Sounds in films are more exaggerated than in real life.

Sound Equipment

Camera HS900

  • Upper Ring - Microphone
  • Lower Ring - Headphones
  • Built-in Mic - Quality is not as good as external mic, you would want your microphone as close to your sound source as possible
  • 5 in 1 surround sound. 

XLR Plug / Cable 

  • Used to transport audio from long distances
  • 3.5 mm headphone jack
  • Locking Device (Silver Pad)
  • 2 metres
Shotgun Microphone 
  • Foam - Wind Sock
  • Designed to pick up sounds from further away
  • Pickup Pattern (Polar Polarity Pickup)
  • Figure out Areas of Rejection to knock out sounds you don't need
  • Tilt the shot gun microphone to use areas of rejection
  • All professional microphones need power
  • In the box: Double A Battery - enough to power the microphone for a very long time
  • Put the battery in by turning the bottom part of the microphone counter clockwise for it to open up for battery compartment
  • Plug in XLR Cable - Line up the three pins. A click indicates that it is locked.
  • Hold metal part to remove XLR Cable
  • Connect the other part into Mic Jack
  • Open up hand strap and loop the cord through the hand strap, because the microphone puts a lot of pressure on the camera
  • Before you plug cable in, unravel the entire cable, so all the signals get through; Imagine sound to be like water 
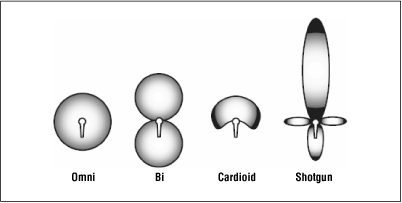
  • WIND SOCK cuts down wind noise. 
  • If it is very windy, DEAD CAT will stop all wind noise, for outdoor shooting only. 
LCD Screen 
  • Sound is measured in decibels
  • You can see how much signal input is being recorded with the white bars
  • Sound is too loud, bars go red. 
  • SOUND DISTORTION (too loud) CANNOT BE REMOVED.
  • Signal should always be touching last / fourth white bar.
  • Always record sound that's a little too quiet than a little too loud. Gives you more latitude.
  • Main Menu --> Blue Menu --> Record Setup (8 pages for manual) --> Mic Level --> Click "Set" --> Start at around -6 to -9 
  • Digital Audio Meter -0 dB is too loud
  • Microphone should be as close to sound source as possible
  • Sound Check: find the optimal mic level - have the person talk / whisper / yell, check the input bars
  • Signal to Noise - Ratio, the louder your signal is, the more noise will be recorded.
  • Mono-Signal. Audio gets split into stereo (left and right equally).
  • Any time you record sound, you MUST wear headphones to hear the quality. 
  • Scroll through Main Menu to set Headphone Volume (different from mic. level). Good place to start is 15-18, maximum value is 30. 
  • AVOID microphone level too high / low, headphone volume too low / high. Start with -9 Mic Level, and 18 Headphone Volume. From that point on adjust it according to your circumstances.
Boom Stick / Boom Mic
  • To get closer to subject
  • Use areas of rejection
  • Shock Mount - connected to boom pole with rubber bands, reduce vibrational noises. You can angle this.
  • Make sure boom pole doesn't get into the frame. 
  • Pole can be extended.
  • Position the pole on your shoulder, or lean it on something (that doesn't move)
  • Never rest the boom pole vertically, you will damage the cables. 
  • You aim the boom mic at invisible circle around the chest / throat.
  • Dialogue between two people: turn the microphone from person to person. 
  • At the end of the shooting day, you must record 60 SECONDS OF COMPLETE CONTINUOUS SILENCE / SOUND FROM THE LOCATION (ATMOS TRACK).
  • Noise Print, allows you to reverse the polarity of the sound. Use Atmos track to fill in spaces and recreate sound of the location. Create foley to make it sound like it was recorded in the location.

Tuesday, September 20, 2016

Lesson 11: Tech Class - Lighting

Importance of Lighting
- Direct audience's focus onto subjects
- Create mood
- Makes film look more professional

Learn to pre-visualize how the light will look like.

Equipment
Light Stands (C-stands)
- Works like a tripod
- The wider the base is, the better the light is supported (lower center of gravity)
- Pin on top
- Make sure to lock all sections of your C-stands
- Ball heads - to move the light
- Loosen the ball head first, then put it on, and tighten it.

Two Panel Fluorescent Light 
- Does not heat up
- Colder Tone
- Flexhead gives you the ability to angle the light you want
- Barn doors, can be used to block light (flagging), control light - types: reflected / matte barn doors
- No dim / color control, only ON / OFF

LED Light
- A lot lighter
- Last longer
- Powered by battery / battery plug
- Reflected barn door (reflected surface can be removed for matte surface)
- Clips to attach accessories
- Dim control - can control light output
- LCD Display - output power, light temperature, light output
- Can change the temperature, match white balance with it
- Does not heat up
- Two sizes, the larger the light, the longer it will last, the larger the output
- Tungsten filter - for day light, diffuser filter

Tungsten / HMI Lights
- drama studio, auditorium lights
- too strong, can tint the color of the light onto the wall
- too dangerous, used in professional film sets

Lighting Control
Gel Kit (Black Bag)
- Different colours allows you to different things with the light: CTB, CTO, etc
- Wooden pegs (C47)

Diffusion Kit (Red Bag)
- Lower concentration in certain areas, spread out the light, increase range of light, soften shadows
- Different levels of diffusion - different sheets
- Can be used on windows

Flags
- Help block the light, block out the sun
- Rod -attach to the side of the C-stand
- Black / full stop flag - fully blocks out light
- French flags - smaller flag
- Full stop removes two candles, half stop removes one
- Dots

Reflector
- Also called bounce (bounce + flag for sunny days)
- Silver side - for warmer light, black side, gold side - warms up person's face, half stop - diffusion
- Cast reflections
- Small bounce & big bounce
- To close it: Grab opposite corners, with opposite hands, and fold together

Using the light
- Make sure no one is in front of the light when you turn it on
- Test one light at a time


Monday, September 19, 2016

Lesson 10: Location Scouting


Today, Charlotte wasn't at school, therefore, I had a bit of trouble figuring out what I should do since she has the storyboard and I was not able to contact her at the time to ask her which scene she is up to. The first draft of the script is completed and the director went to Ms. Ward to ask for feedback. We then discussed what dates and times we should film, as well as when we need to borrow & return equipment from the school film lab. Afterwards, the three of us went location scouting, and we went to the new building to look for places we can film at, considering aspects like interior / exterior lighting, sound, furniture (where we could place tables, where the windows are, whether there are curtains or blinds). The tables may look a bit childish, but repositioning it / filming from a certain angle and filtering the shot (B&W) should help. There are socket outlets in the room as well, which will be helpful as we can charge the camera while filming to save battery. However, since we will be filming at night, we will have to come here again at night time to reevaluate the conditions, especially the lighting and sound. I think it would be good to have a room with blinds to film, since we are hoping to create lines and shadows in the frame. However, from my observations today, there aren't any places at school with blinds. We should think about places outside of school that would be potentially good to film at.

* Idea: Ms. Chang's office has blinds? 


Tuesday, September 13, 2016

Lesson 9: Tech Class

Year 11 Camera: Panasonic HDC HS900
  • Full HD Camera, 50p, 1920 x 1080 (can swap to 1080/50p)
  • Good for Slow Motion & Time Lapse
  • Ring Dial w/ Assign Button in front: Instant Access to the Camera Functions: Focus
  • 3MOS Sensor: Creates vivid images, good for visual effects & colour correction
  • Shortcut Buttons for Zoom
  • Two Types of SD (Secure Digital) Card Slots: Card goes in halfway / Full card goes in 
  • 16GB SD Card: Class 10 (Speed) SD Card. The side with the sticker is the front of the card.
  • Built-in Speaker
  • Change the Battery using Battery Release Button
  • View Finder: when screen is too bright on sunny days, you can check if the shot is in focus with View Finder
  • Corner of the Camera: Plug for the Camera Cable (Once it's plugged in you will see the light) *When filming indoors, plug in cable to save battery life
  • Next to Hand Strap: Audio Input / Output
  • Can Record in 220 GB Hard Disk (For Time Lapses)
  • Lens Hood - to keep the sun off the lens 
  • 5 in 1 Surround Sound Microphone
  • Telephoto Feature (don't press the wrong button)
  • OIS Button: Image Stabiliser 
  • Manual Button: Controls whether camera is Automatic or Manual
  • Dial on the Top: Switch Mode: Playback - Filming
  • Shoe - plug in lights, microphones
Camera Functions - LCD Screen
  • Bottom Left Hand Corner (Triangles): Main Menu Button
  • Blue Menu
  • Q Menu - Quick Menu
  • Shortcuts for Zoom, WB, etc
  • Touching the Screen would bring up the features 
  • 2h 46 mins / 1h 22 mins Recording Time
  • HG 1920: 25 pf / 50i or 1080/50p - Must record with same format on SD card
  • 3MOS Sensor (Computer Chip that Captures the Image - Determines Size and Resolution) - Light Travels through the Lens to the Iris to the Shutter
  1. Initialise (Format the SD card - Delete all the footage, and prepare the SD card structure for when it is plugged into the laptop): Blue Menu - Setup - Scroll to FORMAT MEDIA - Select SD CARD
  2. White Balance: More Tones of White than any colour in the World. Avoid shadows on the image when placing white in the camera's field of view. Main Menu - Scroll Through Menu - WB - Find the Icon and Press it. Take your white balance at where you are filming.
  3. SHTR: Shutter: Speed: 1/25, 1/50, 1/100, 1/125 etc. Shutter Speed controls the exposure and motion blur of the image. Overexposed (too bright); Underexposed (too dark). Slow Motion - use as high shutter speed as possible (along with higher frame rate and a lot of light - adjusting IRIS). Base Line Shuttle Speed: Shooting in frame rate 25p - 1/50 (Natural Motion Blur); 50p - 1/100 (Double It - 180 Degree Rule)
  4. IRIS: Camera 'Eye': Blades that form a circle and controls the amount of light let into your image (exposure) as well as Depth of Field (shallow focus / deep focus). Above 3dB - image will become grain. F-stops - size of the Iris / focus range - the lower the number, the more shallow the depth of field. If not necessary, leave it on OPEN.
  5. FOCUS: Determines if something is clear / sharp / blurred out. Choose MF (manual focus), and use Ring Dial to adjust focus. Focus Assist - the blue lines show what is in focus. If blue box doesn't show up: Menu Button - Record Setup - MF Assist - Turn it on.
  6. ZEBRA: Overexposed areas will show Zebra lines. (You can see when adjusting Iris)
Location Scouting: Take photos, and use your phone to record sound (30 SECS). Go at the time when you will be filming.

Before the Tech Session started, Charlotte, Wing Kwan, and I started working on the storyboard and discussed what opening shots we should use, while Henry worked on the script. All three of us had different opinions, but we were all very open-minded to each other's ideas. We would give suggestions to each other's ideas and decide on which is more suitable.

Monday, September 12, 2016

Lesson 8: Brainstorming

Today, Henry, our screenwriter, was working on our script, while the rest of us worked on setting up our shot list and schedule. Charlotte and I, as the cinematographer and editor, started brainstorming some shots that we can film and how we can create that shot. Below are some ideas we came up with during the lesson:

  1. Smoking cigarette scene -
    use an actual cigarette, but only film the silhouette of the actor “smoking” it
  2. Reflections - mirrors, glass windows
  3. Blinds (where?)
  4. Empty Chair in the beginning (Close Up of Justice holding up the device, and talking into it, close up of his mouth +device), Empty Chair at the end
  5. Don’t show eyes in the beginning (only show mouth), as the story unravels start showing his eyes: Zoom out of close up when “I never forgot how you just dismissed the case after a while, stating it was "just a waste of time" to keep the search going”
  6. Silhouette of door closing / blinds


When the script is almost completed, Charlotte and I will start storyboarding. Meanwhile, we will keep on brainstorming ideas for shots, and later on select the suitable ones and organise them into a shot list.

Another change that we made this lesson is the change of actress. Charlotte cannot act because she is the cinematographer and will have to direct the cameraman when we are filming. Therefore, we could either find an actress to act for us, which would be quite inconvenient since we would be taking up a lot of her own time, or I might have to considering taking on the role, even though I am not sure if I will be able to do well as an actress since I do not have much experience in acting and do not like being on camera. Perhaps it would be fun to take this risk, step out of my comfort zone, and try something that I don't do very often!!


As a group, we also decided when we would start shooting. Our shooting dates will be 2nd October, 9th October, 16th October, and 23rd October. We will also spend class time filming. 

Project Requirements:
- Script
- Shot List
- Storyboards
- Schedule 
- Production Plan

Friday, September 9, 2016

Lesson 7: Assessments...

8th September, 2016
Today, we were introduced to the assessments we will be working on for this unit, which essentially consists of an essay about Film Noir and a 7-minute film (along with the production plan). Ms. Ward briefly mentioned the requirements for the tasks, and we were then put into groups of 3-4 after picking our desired role / role we would be interested in developing. 

I chose to be the editor for this unit as it is the role that I feel most confident about and I hope to start off the year with something I am more familiar first, so I can easily adapt back to the CISHK environment and demands. I also hope that I can learn from my group-mates' work and observe what their strengths are during this unit so I can be more confident with taking on a different role next time. I have always enjoyed editing, as I like how by controlling the sound as well as where scenes cut I can create completely different moods / atmospheres, which largely impacts how the audience will perceive the film. 

I was put into a group with Charlotte (cinematographer), Wing Kwan (director), and Henry (screenwriter & sound editor). The four of us gathered around a table and started discussing what our roles are, what our plot should be, and who should be the actor / actresses. At first, none of us were 100% willing to act in the film, and we thought about recruiting people to act for us. However, that would be very inconvenient since we will have to take the actor / actress's schedule into consideration. Therefore, Wing Kwan and Charlotte volunteered to be the actor / actress. Since Wing Kwan is the director and Henry is the screenwriter, they led most of the storyline discussion, while Charlotte and I listened most of the time. I think I could've contributed more of my ideas and be more active during the discussion, as I didn't feel 100% comfortable with my group mates since I do not know all of them well. I hope that over time, this issue will be solved and I can comfortably express my ideas, and focus on doing what my role is responsible for. After this lesson, I should review some film noir elements and think about how the different scenes can be portrayed.

Our group's next step is to finalise the details of the plot. Below is the summary of our story so far:

The protagonist, currently either a journalist or a detective, is revealed to have a lost loved one, who was apparently murdered. While investigating her death, he joins sides with the femme fatale, who promises to help him find the killer. Ultimately after following a few clues, the femme fatale presents the presume whereabouts of the killer, and they agree to meet up there. However, it is revealed that the femme fatale is actually the killer and she followed him on his case to eventually kill him. They end up in a scuffle and in the end both die. The protagonist manages to narrate the entire story, eventually causing the flashback timeline as well as the present timeline to merge. The protagonist dies.


Monday, September 5, 2016

Lesson 6: Notes about Film Noir

Repetition of elements makes a genre. Some argue that film noir should be a genre, due to repetitions in plot, character, iconography, but it is too similar to another genre (thriller) to be categorised as its own. What distinguishes film noir from thriller is its style and overall appearance (storyline and character may fall into the thriller genre).

In film noir, the most significant feature is the strong emphasis and dramatic use of light and dark (lighting and shadows), as it gives a lot of suggestions to storyline, characters, relationships, and often foreshadows what will be happening next. The storyline is meant to reflect something bigger in society. Double Indemnity adopts a non-linear storyline, and the story is dictated to the audience. There are a lot of plot twists, which makes the audience feel uneasy and unsure about who to trust / the true identity of characters.


"Happiness is fleeting in noir films; worse yet, it is a cruel illusions, a twist of fate which promises power, sex, and money but which delivers only suffering."

Film noir reflects the culture of the time - Post World War II - the misery of society / social outcasts / depressing atmosphere. It is a term coined by French critics to categorise American films from the 1940's to the 1960's which presented a gloomy, pessimistic world view. The contemporary version of film noir is called Neo noir.

German Expressionism is another film style that came before Film Noir, which also uses strong contrasts between light and dark. 

Historical Background: World War II caused great changes in American society and had a great impact on cinema. When looking at films, look at its historical background and cultural setting. Though victorious, American soldiers returned to an aftermath of social frustration caused by the atrocities of war, industrial disputes, race riots, fear of the atomic bomb, and changing gender roles (because all the men went to war).

The Noir World
External |
Exterior Settings, Dark, mean streets of the big city, or a too perfect Los Angeles, with its beaches, apartments, palm-lined trees;
Interior Settings: Nightclubs, cafes, police stations, haunts of the underworld.

Internal |
Violence, trauma, nightmares of the hero's mind - often they are depictions of the protagonist's mental state.

Cinematography
  • Hard / undiffused look
  • Looks like a tabloid newspaper
  • Cluttered, dark, claustrophobic interiors framed or restricted by camera frame
  • Many night scenes
  • Dutch angle and deep focus shots
  • Stark light / dark contrasts
  • Low key lighting
  • Bleak, fatalistic overtones of despair / madness
  • Heightened expressionistic scenes with elements distorted / grotesque / exaggerated 
Iconography (things you expect to see in the film)
  • Telephones
  • Voice recorders
  • Newspapers
  • Dark sidewalks
  • Rain-drenched streets
  • Flashing neon lights
  • Fairgrounds & Carnivals 
  • The city as a villain / dangerous / hostile 
  • The border town or casino
  • Imagery of water and alcohol that represent merging and release 
General Principles
  • World of film noir is where protagonist is "out of his depth"
  • Film noir recognises people's inherent capacity for disaster
  • Actions of the protagonist leave the viewer with a sense of moral ambiguity and a sense of "the lesser of two evils" (you feel sorry for the bad guy - antiheroes)
  • Protagonist is isolated; he fights alone yet must be part of society
  • Protagonist earns his own damnation / redemption
  • Film noir often ends with a sense of futility / meaninglessness
Plot Structure
> Set Up
  • Protagonist on the edge of a world of dubious values
  • Protagonist has maintained integrity and is in control of his situation
  • Protagonist uneasily accepts the status quo 
> Conflict
  • Protagonist drawn into a situation for ambiguous motives (sexuality, money)
  • Protagonist acts according to experience, but without complete knowledge
  • Opposing forces manipulation protagonist, usually without him knowing
  • Protagonist's flaws emerge. Goes through process of moral self-discovery as hidden elements of his situation are revealed. 
  • Protagonist provokes others to take action against him.
  • Clash for power / shift in balance of power occurs. 
  • Movement continues towards catastrophe.
> Resolution 
  • Recognised defeat, protagonist aware of error and longs for a simpler time when life was less complicated
  • Defeat occurs due to a character flaw 
The protagonists of the stories may be cool private eyes, newspaper reporters, victims of deception, good men / women gone wrong, hard-core criminals, often driven by obsession with women. No expression in voices. Frequent images of olden men connected to the Female Fatale.

Characteristics

  • Low-key lighting 
  • Unique angles of throw - makes character more grotesque, can symbolise one's power over another. Shows who the character is on the inside. 
  • Equal lighting on setting and character
  • Deep focus - to reveal secrets to the audience
  • Internal Framing / Masking (frames) - show entrapment ("internal prison) in the world they are in 
  • Compositional Balance with Mirrors - to reveal to the audience what the character can't see, symbolises the duality of character, suggesting that there is an alternative aspect to that character
  • Oblique Angles - use of lines - often foreshadows criminal activity - lines symbolise prison 
  • Unconventional Camera Angles - to show the characters' power 
  • Dutch Angles - to make characters look superior / vulnerable, and make the audience feel uncomfortable since its unconventional / not horizontal
Story Essential Motifs
  • Love of romantic narration (voice-over) - irretrievable past
  • Complex chronological order - hopelessness and lost time
  • Flashback --> denies effect of progress
  • Flawed leading man
  • "Femme Fatale" - woman who lures protagonist from stability to lawless disorder
Themes
  • People have turned to paranoia and claustrophobia
  • Passion for the past and present, but also a fear of the future
  • No one can be trusted
  • The world is unforgiving and hopeless