Audio is more important than visual. Improving the audio can raise the overall quality of the film.
Sounds in films are more exaggerated than in real life.
Sound Equipment
Camera HS900
XLR Plug / Cable
Sounds in films are more exaggerated than in real life.
Sound Equipment
Camera HS900
- Upper Ring - Microphone
- Lower Ring - Headphones
- Built-in Mic - Quality is not as good as external mic, you would want your microphone as close to your sound source as possible
- 5 in 1 surround sound.
XLR Plug / Cable
- Used to transport audio from long distances
- 3.5 mm headphone jack
- Locking Device (Silver Pad)
- 2 metres
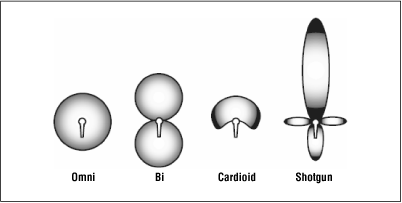
Shotgun Microphone
- Foam - Wind Sock
- Designed to pick up sounds from further away
- Pickup Pattern (Polar Polarity Pickup)
- Figure out Areas of Rejection to knock out sounds you don't need
- Tilt the shot gun microphone to use areas of rejection
- All professional microphones need power
- In the box: Double A Battery - enough to power the microphone for a very long time
- Put the battery in by turning the bottom part of the microphone counter clockwise for it to open up for battery compartment
- Plug in XLR Cable - Line up the three pins. A click indicates that it is locked.
- Hold metal part to remove XLR Cable
- Connect the other part into Mic Jack
- Open up hand strap and loop the cord through the hand strap, because the microphone puts a lot of pressure on the camera
- Before you plug cable in, unravel the entire cable, so all the signals get through; Imagine sound to be like water
- WIND SOCK cuts down wind noise.
- If it is very windy, DEAD CAT will stop all wind noise, for outdoor shooting only.
LCD Screen
- Sound is measured in decibels
- You can see how much signal input is being recorded with the white bars
- Sound is too loud, bars go red.
- SOUND DISTORTION (too loud) CANNOT BE REMOVED.
- Signal should always be touching last / fourth white bar.
- Always record sound that's a little too quiet than a little too loud. Gives you more latitude.
- Main Menu --> Blue Menu --> Record Setup (8 pages for manual) --> Mic Level --> Click "Set" --> Start at around -6 to -9
- Digital Audio Meter -0 dB is too loud
- Microphone should be as close to sound source as possible
- Sound Check: find the optimal mic level - have the person talk / whisper / yell, check the input bars
- Signal to Noise - Ratio, the louder your signal is, the more noise will be recorded.
- Mono-Signal. Audio gets split into stereo (left and right equally).
- Any time you record sound, you MUST wear headphones to hear the quality.
- Scroll through Main Menu to set Headphone Volume (different from mic. level). Good place to start is 15-18, maximum value is 30.
- AVOID microphone level too high / low, headphone volume too low / high. Start with -9 Mic Level, and 18 Headphone Volume. From that point on adjust it according to your circumstances.
Boom Stick / Boom Mic
- To get closer to subject
- Use areas of rejection
- Shock Mount - connected to boom pole with rubber bands, reduce vibrational noises. You can angle this.
- Make sure boom pole doesn't get into the frame.
- Pole can be extended.
- Position the pole on your shoulder, or lean it on something (that doesn't move)
- Never rest the boom pole vertically, you will damage the cables.
- You aim the boom mic at invisible circle around the chest / throat.
- Dialogue between two people: turn the microphone from person to person.
- At the end of the shooting day, you must record 60 SECONDS OF COMPLETE CONTINUOUS SILENCE / SOUND FROM THE LOCATION (ATMOS TRACK).
- Noise Print, allows you to reverse the polarity of the sound. Use Atmos track to fill in spaces and recreate sound of the location. Create foley to make it sound like it was recorded in the location.

No comments:
Post a Comment