Sunday, October 23, 2016

Monday Shoot (17th October) & Thursday Shoot (20th October)

This is our last week to film before our production is due, since our director / male lead is away during mid-term break. We first filmed on Monday at Dr. Mok's office, finishing all our office scenes, then filmed the street & home scenes at Wing Kwan's house on Thursday. In this post, I will discuss and reflect on my contribution to the following areas:

Preparation for Post-Production 
At the beginning of the filming sessions, I would help with initialising the SD card to make sure the card format is compatible with my laptop. After every filming session, I imported all of the footage onto my laptop - on which I have installed Final Cut Pro X so I could edit during mid term break. After checking the Final Cut Pro preferences (selected "create optimised media" and "create proxy media"), I have started logging the footage from last week's shoot by naming them and making use of the reject / favourite function to organise the clips. 

Logistics (Time Management, Equipment, Locations, Props, etc.)
As the editor, my job largely focuses on the post-production stage. Therefore, during the production stage, I helped with borrowing equipment and reserving locations (communicating with Dr. Mok about using her office). We made a lot of changes to our production plan. Originally, we planned to film our office scenes at Wing Kwan's house, but after location scouting, we decided that Dr. Mok's office is the ideal setting to film our scenes since her office has blinds which we could use to create the iconic venetian blind effect in film noir. We also hoped to finish filming all our scenes by the beginning of the second week of October, but due to our team's miscommunication and our busy schedules, we completed most of the filming during the third week of October. In the second week, we spent two class periods at her office filming, but we did make much progress from those two sessions, since it took us almost half the period to get ready (setting up equipment and changing into costumes) to film as we were still in the process of re-familiarising ourselves with the using the equipment.

It was difficult to find a time when everyone is free to film - on Monday, Henry could only participate in the first half of the shoot; on Thursday, Charlotte couldn't attend the session. This may have impacted the quality of our film since Charlotte / Henry had to control the camera and hold the microphone at the same time by themselves since Wing Kwan and I were acting. During our Thursday shoot, we found Hadrien to help us act as the "knowledge dude" in our film, but the issue was that he was in a hurry to leave and with only around fifteen minutes left, we were therefore in a rush to finish filming his scenes. Meanwhile, we could not get the microphone to work properly, hence we will have to do voiceovers afterwards. From my point of view, the situation was slightly out of control as the scene was added to the script after our cinematographer finished the storyboard and we had to decide on the spot about what shot types to use for that scene. What we should've done is to plan out the shots beforehand with the cinematographer, especially because she could not attend the session. We should have also reconfirmed with each other about the shooting dates to make sure everyone can participate and to avoid any confusion (we borrowed equipment and then returned it right afterwards as we realised we were not shooting).

Cinematography
Since I am the editor, my role focuses on the post-production stage. During the filming sessions, I shared my ideas with the group about the framing and the lighting, even though the final decision is still made by the director and cinematographer. Throughout the production stage, I have started thinking about how I would edit the film - for example, in the scene of the male lead dying, I would like to try adjusting the frame to make it seem like the shot was filmed with a dutch angle, since this is one of the major characteristics of film noir that I don't think we used during our production stage. I would also like to try adjusting the colour scheme of the shots in the opening scene / ending scene and apply a blue / purple tint to it (Wong Kar-wai editing style). After reviewing the footage, I also noticed that some shots are quite bright / do not have a strong contrast between black and whites, therefore during post-production, I would like to try adjusting the contrast to emphasise the use of chiaroscuro lighting in our film. Unfortunately, there were some construction noises during our Tuesday shoot, and we made the mistake of not turning off the air-conditioner sound during our Thursday shoot, so I will have to work on noise cancelling when editing. At the end of each filming session, I would review the footage and make sure that the visual and audio quality is okay, looking out for what we could improve for our next shoot. We also filmed some of the scenes from different angles so that I can decide which one best fits our film when editing. 

Friday, October 14, 2016

Lesson #16: Film Shoot #2

Today during Period 2, we went to Dr. Mok's office to film our office scenes again. Things went quite well in general, but when Wing Kwan was trying to do his voiceover, there were some construction sounds going on in the background. We will have to review the footage to see if the construction noises can be heard. I think that we need to use more close ups and dutch angles, and experiment with the lighting a bit more in our office scene. In the opening scene, where Wing Kwan is sitting at the desk, I feel like there is too much light shining on his face, even though it does create a nice silhouette in the background. 

Tuesday, October 11, 2016

Lesson #15: First Shoot

Today during class we started filming our first office scene. We got permission from Dr. Mok to use her office during Period 1 to film. It took us quite a long time to set up all the equipment and decide on where the camera should be positioned, so in the end we only had around 20 minutes of shorting time, which allowed us to finish filming a very short opening scene. Setting up was very consuming because it turned out that both the batteries we were given were not working, so we had to go back and forth from Mr. Chiang's office to Dr.Mok's office. We were not able to use the battery charger because there were no sockets around where the camera needed to be placed. Next lesson, we should be able to have more time to film because we have now figured out where the camera needs to be and became familiar with adjusting the camera settings and setting up all the equipment. 

Saturday, October 8, 2016

Lesson #14: Tech Class - Editing

Final Cut Pro X (not Final Cut Pro 7)
Icon with Four Stars = Library

1. Check Final Cut Pro Preferences - Import Tab: MUST Select "Create optimised media" and "Create proxy media". Do not select "Analyze for balance color / fix audio problems".

2. File Organisation: Label your library. Label your event (one star icon).
Never title your film "Final". 
Good organization skills is important to have. 

3. Import media (down arrow): Always import all of your clips. Click the number button below the viewer - opens background render - tells you what is happening. 
Inspector window - inspect or alter any audio or video you need to change. 

EDITING PROTOCOLS
01. Logging 
Going through all of your footage and define whether footage is good or not, using a labelling system - Green Star and Red X button. Select the clip and either FAVOURITE (letter F or green star) or REJECT (delete key or Red X) it. Green / Red line will show up. Go to dropdown bar and you can choose to only view favourite / rejected clips.

Relabel clip names if you have time. 

02. Assembly Edit
Putting the clips in the correct order in the timeline (not trimming anything, no effects at this point). 
Command N to create new project (exists within event). Select clip and drag it onto timeline. 
Insert buttons: Button E - adds clip to the end of the timeline. To do a smooth slow motion, you go to Settings and choose Interlace. 

03. Rough Edit 
Trimming clips, using the Razor Blade Tool (keyboard shortcut key B / cursor: A).

04. Fine Edit / 2nd Edit
Looking to see if we need transitions:

- Cut vs. Jump Cut - jump cut is transition between clips from the same scene, cut is transition between different scenes. 

- Dissolve - Cross Dissolve: use when you are moving from scene to scene. Can be used to show passage of time, or to transition from black screen.

Every film must START and END with a BLACK SCREEN (5 secs) - go to generators button (box with 2 inside) - go to Solids - choose Customs - drag into front of timeline. 

SOUND
Go through level of sound - sound waves of each clip - you can look at sound meter on the side:
Dialogue: between -6 and -3.
Sound effects: between -6 and -9.
Theme music & Ambience: between -6 and -10.

Sound peaks - distorted sound - lower the volume bar to adjust volume. Avoid recording loud sound - distortion cannot be fixed.  Volume Bar - hold down option key to create dots and select individual bits of sound. 

Inspector: Audio Tab - Audio Enhancement -You can select Background Noise Removal - be careful with the amount you apply. 

Letter Key V - disables the clip. 

Panning - Go to Audio: Pan Mode. Sound from left to right. Create 3-dimensional space in sound. 
You can also choose Surround Sound and fit sound in different places - makes sound feel more dynamic and real. 

Audio Effects.
Audio Equalization - enhance voices. 
Expand Audio Components / Channel Configuration - view channels. 

All the sounds you use must come from Final Cut Pro or the online library. 
Royalty free music is not reliable, not really "royalty free". You can record your own foley. 

VISUAL EFFECTS
Magic Wand - Show Color Board - Color Correction Panel:
- Global Color Correction
- Shadows
- Mid-Tones
- Highlights

Saturate - turn to black and white. 

Exposure: 

To apply color settings to all other clips - Go to Edit - Copy and Paste Attributes. 

You can automate effects. 

Lesson #13: Working on Production Plan

Today is the last lesson for us to finalise our production plan with our group members. We needed to find a location for our office scenes, preferably a place with blinds. I thought that Ms. Chang's office would be suitable, so Charlotte and I went location scouting while Wing Kwan and Henry continued to finalise the script. In the end, we discovered that Dr. Mok's office would be a better option because Ms. Chang's office is too small and there's a LED board in the middle of her windows. We will have to ask Dr. Mok for permission to use her office.


Thursday, September 22, 2016

Lesson 12: Tech Class - Sound

Audio is more important than visual. Improving the audio can raise the overall quality of the film.
Sounds in films are more exaggerated than in real life.

Sound Equipment

Camera HS900

  • Upper Ring - Microphone
  • Lower Ring - Headphones
  • Built-in Mic - Quality is not as good as external mic, you would want your microphone as close to your sound source as possible
  • 5 in 1 surround sound. 

XLR Plug / Cable 

  • Used to transport audio from long distances
  • 3.5 mm headphone jack
  • Locking Device (Silver Pad)
  • 2 metres
Shotgun Microphone 
  • Foam - Wind Sock
  • Designed to pick up sounds from further away
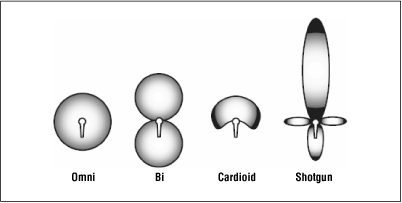
  • Pickup Pattern (Polar Polarity Pickup)
  • Figure out Areas of Rejection to knock out sounds you don't need
  • Tilt the shot gun microphone to use areas of rejection
  • All professional microphones need power
  • In the box: Double A Battery - enough to power the microphone for a very long time
  • Put the battery in by turning the bottom part of the microphone counter clockwise for it to open up for battery compartment
  • Plug in XLR Cable - Line up the three pins. A click indicates that it is locked.
  • Hold metal part to remove XLR Cable
  • Connect the other part into Mic Jack
  • Open up hand strap and loop the cord through the hand strap, because the microphone puts a lot of pressure on the camera
  • Before you plug cable in, unravel the entire cable, so all the signals get through; Imagine sound to be like water 
  • WIND SOCK cuts down wind noise. 
  • If it is very windy, DEAD CAT will stop all wind noise, for outdoor shooting only. 
LCD Screen 
  • Sound is measured in decibels
  • You can see how much signal input is being recorded with the white bars
  • Sound is too loud, bars go red. 
  • SOUND DISTORTION (too loud) CANNOT BE REMOVED.
  • Signal should always be touching last / fourth white bar.
  • Always record sound that's a little too quiet than a little too loud. Gives you more latitude.
  • Main Menu --> Blue Menu --> Record Setup (8 pages for manual) --> Mic Level --> Click "Set" --> Start at around -6 to -9 
  • Digital Audio Meter -0 dB is too loud
  • Microphone should be as close to sound source as possible
  • Sound Check: find the optimal mic level - have the person talk / whisper / yell, check the input bars
  • Signal to Noise - Ratio, the louder your signal is, the more noise will be recorded.
  • Mono-Signal. Audio gets split into stereo (left and right equally).
  • Any time you record sound, you MUST wear headphones to hear the quality. 
  • Scroll through Main Menu to set Headphone Volume (different from mic. level). Good place to start is 15-18, maximum value is 30. 
  • AVOID microphone level too high / low, headphone volume too low / high. Start with -9 Mic Level, and 18 Headphone Volume. From that point on adjust it according to your circumstances.
Boom Stick / Boom Mic
  • To get closer to subject
  • Use areas of rejection
  • Shock Mount - connected to boom pole with rubber bands, reduce vibrational noises. You can angle this.
  • Make sure boom pole doesn't get into the frame. 
  • Pole can be extended.
  • Position the pole on your shoulder, or lean it on something (that doesn't move)
  • Never rest the boom pole vertically, you will damage the cables. 
  • You aim the boom mic at invisible circle around the chest / throat.
  • Dialogue between two people: turn the microphone from person to person. 
  • At the end of the shooting day, you must record 60 SECONDS OF COMPLETE CONTINUOUS SILENCE / SOUND FROM THE LOCATION (ATMOS TRACK).
  • Noise Print, allows you to reverse the polarity of the sound. Use Atmos track to fill in spaces and recreate sound of the location. Create foley to make it sound like it was recorded in the location.

Tuesday, September 20, 2016

Lesson 11: Tech Class - Lighting

Importance of Lighting
- Direct audience's focus onto subjects
- Create mood
- Makes film look more professional

Learn to pre-visualize how the light will look like.

Equipment
Light Stands (C-stands)
- Works like a tripod
- The wider the base is, the better the light is supported (lower center of gravity)
- Pin on top
- Make sure to lock all sections of your C-stands
- Ball heads - to move the light
- Loosen the ball head first, then put it on, and tighten it.

Two Panel Fluorescent Light 
- Does not heat up
- Colder Tone
- Flexhead gives you the ability to angle the light you want
- Barn doors, can be used to block light (flagging), control light - types: reflected / matte barn doors
- No dim / color control, only ON / OFF

LED Light
- A lot lighter
- Last longer
- Powered by battery / battery plug
- Reflected barn door (reflected surface can be removed for matte surface)
- Clips to attach accessories
- Dim control - can control light output
- LCD Display - output power, light temperature, light output
- Can change the temperature, match white balance with it
- Does not heat up
- Two sizes, the larger the light, the longer it will last, the larger the output
- Tungsten filter - for day light, diffuser filter

Tungsten / HMI Lights
- drama studio, auditorium lights
- too strong, can tint the color of the light onto the wall
- too dangerous, used in professional film sets

Lighting Control
Gel Kit (Black Bag)
- Different colours allows you to different things with the light: CTB, CTO, etc
- Wooden pegs (C47)

Diffusion Kit (Red Bag)
- Lower concentration in certain areas, spread out the light, increase range of light, soften shadows
- Different levels of diffusion - different sheets
- Can be used on windows

Flags
- Help block the light, block out the sun
- Rod -attach to the side of the C-stand
- Black / full stop flag - fully blocks out light
- French flags - smaller flag
- Full stop removes two candles, half stop removes one
- Dots

Reflector
- Also called bounce (bounce + flag for sunny days)
- Silver side - for warmer light, black side, gold side - warms up person's face, half stop - diffusion
- Cast reflections
- Small bounce & big bounce
- To close it: Grab opposite corners, with opposite hands, and fold together

Using the light
- Make sure no one is in front of the light when you turn it on
- Test one light at a time